
1960 Cadillac Coupe de Ville - part 11
If you haven't read the tenth part of this restoration you can find it by clicking on this link: 1960 Cadillac Coupe de Ville - part 10
11. Restoration of the body
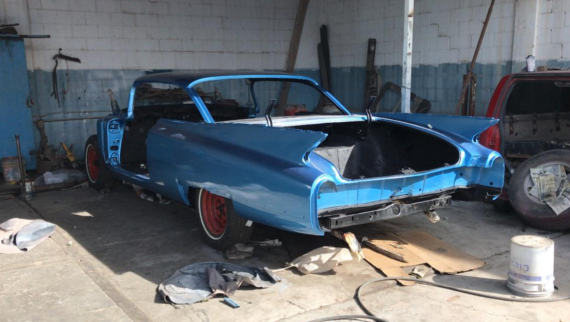
So the body is off the frame now and so far I have to admit that they have been working pretty fast. But then, taking a car apart is the easy part right? What is going to separate the boys from the men is what is going to start now and the end result will be the only judge of how good they actually are.
For now, the first thing to do is to remove all the old paint. This car was initially painted in blue but on top of that, it was re-sprayed in pink most of which has already gone away apart a little at the bottom of the door panels. Then underneath all that, there is at least one coat of primer which is the red-ish paint that can still be seen mainly on the hood and of course all the surface rust on the roof and the filler (it is called Bondo in the US) that was used to hide the dents on the body. Now this can normally be done pretty easily by sand blasting the body but in this case, there was so much Bondo in some places and so many coats of paint that even the sand blast wasn’t strong enough to get rid of it easily so they had to start with by applying some chemical paint removal and then sand blast the body.
 This revealed an interesting part of the history of my car. On the driver’s side, right behind the door, there was the consequences of what must have been a pretty nasty accident. All the sheet of metal was completely dented. And dented here is an understatement. The quick fix for that was simply to put a very thick layer of Bondo on top of it and re-paint it. That is something that I made very clear to the Mexicans right from the start. I want all the work to be done properly so all this part will have to be straightened up and the Bondo will only be used at the very end to make sure no little defect is left visible.
Another thing I wanted fixed on the car was the two side antennas that it had. Actually these antennas weren’t even connected and were put there with Buick ventiports in the side of the body just for “cosmetic” effect. The best way they had found to keep the two antennas in place in the Buick ventiports was by gluing them there with silicone. So I told the guys that I wanted this holes to be plugged up as well to give this car is original characteristics back.
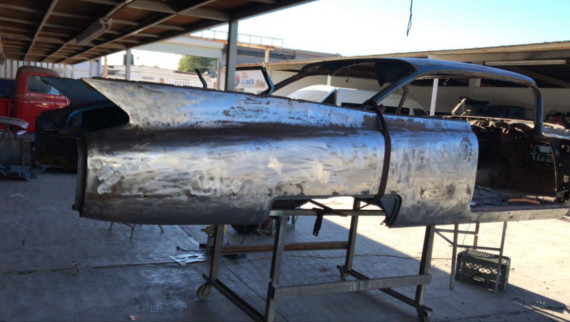
Once all the body work got sand blasted, the next step was obviously to start of the repairs. The main one being the floors of the body this is where they started off, then the antenna holes on the sides and the repairs of the accident dents.
That is a pretty straight forward job because the metal sheets are thick enough to be welded easily and the shapes are pretty easy to replicate so it only took them a few days to get this done. Then started the most complicated part of the job which is to get everything straightened up and making sure that the surfaces are smooth.
 In parallel, the other parts of the body were worked on. The hood in particular had a lot of dents as if it had suffer a hail shower but surprisingly enough it was only on the hood which I can’t really figure out a reason for. The doors and the trunk lid were also prepped up at the same time.
When restoring a car, I think that 90% of the result will come from the preparation for the paintjob. In this case it took weeks. First of all the car is huge and most of the sanding needs to be done by hand to make sure it is perfectly done. What I have going for me is that the weather in this part of the world is very dry which means that the car can stay with the bodywork in bare metal for days without rusting which couldn’t even be considered in the UK or even in France. As soon as the bare metal is exposed, it has to be worked on and primed up straight away. Even waiting overnight would mean that rust would have time to settle.
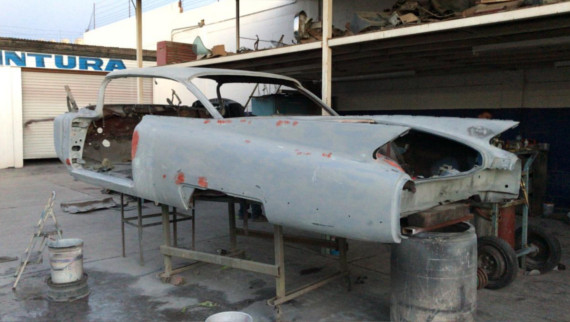
So that took a few weeks to get done and once this got done, the body and the other parts received their first coat of primer. After that, some finish-up filler was applied on the defects that the primer had revealed and another coat of primer was applied.
Once the whole body was all primed up and ready for the actual paintjob, it first received two coats of colour base, then three coats of paint will be applied and another three coats of clear on top of that.
 And it is on an evening a few week before Christmas that I finally receive the first pictures of the body fully painted, shiny and ready to go back on the chassis. It looks lovely and I am very happy with the result. There is still a huge amount of work to do to finish the restoration but at least there is one visible step reached and it looks good.
Now the work is going to slow down a little over the next couple of weeks because of the Christmas and New Year period but they are still going to keep working on the car.
The next step is to restore the chassis. All the dirt mixed with old oil needs to come off first and then in the same way as the body, the chassis will be sand blasted before being painted in black.
It takes a few more days to get everything cleaned up and ready for the paint. And even more so that after arriving at the workshop, the engine and transmission started leaking heavily. This is due to the fact that this car had been sitting in an open field for decades before I bought it and all the gaskets and seals dried up. So when the engine was re-started, the gaskets didn’t resist and cracked. This oil got projected on the chassis too which made a glue-y mix with the dust and dirt of the road.
 My brother was flying to France to spend Christmas with the family where I was supposed to meet him so right before that, he went to the workshop to take as many pictures as possible of what was being done on my car so that he could show me when we met. He also took advantage of going there to bring them brand new rubbers for the car, the headliner, the carpet and the leather for the interior. The cloth for the seats is still not ready so I couldn’t get him to bring it to them. This has been on order for months now and it still isn’t ready. I don’t know what is taking them so long. I get that it is supposed to be original Cadillac cloth but still…
In parallel, I also got ordered brand new side windows for the car. The ones on it were still decent but were starting to delaminate in some places so considering the price of new windows which is not too high, I thought I might as well replace them by brand new ones.
Finally, right between Christmas and New Year’s eve, I got the pictures confirming that the chassis was painted and ready to receive the body again.
And just a few days into the New Year, the chassis was back on the chassis with the doors on it. The rest of the parts still being worked on.


The next step is to get all the gaskets and seals replaced on the engine and transmission, start working on the interior of the car and put everything back together.
To be continued… here: 1960 Cadillac Coupe de Ville - part 12